Spring and Winter Instructions


SPRING START-UP
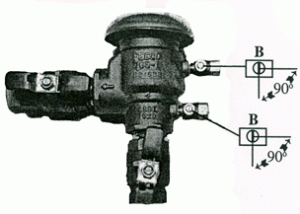
- Go to the Pressure Vacuum Breaker (PVB) located outside the house.
- Close the 2 small ball valves on the side of the PVB using a straight blade screw driver (the slots will be in an up and down position when closed.)
- Close the 2 large ball valve (blue handles) on the PVB (the handles will be crosswise to the valve when closed.)
- Go to the basement and close the drain back valve.
- Open the sprinkler shut off valve in the basement.
- Go to the PVB and open the inlet ball valve (this is the lowest valve on the PVB with a blue handle). You will hear a “pop” as the PVB seals shut (some water may come out of the top of the PVB at this point – this is normal).
- Open the discharge ball valve slowly to a half open position (this is the upper most ball valve with a blue handle on the PVB). This allows the sprinkler main line to fill slowly while keeping pressure in the PVB. After the main line has filled, the valve can be opened full (the handle will be parallel with the ground). You can now check the sprinkler system and be ready for watering this season!
WINTERIZATION
- Go to the basement and close the main shut off valve to the sprinkler.
- Hang a bucket on the drain back valve and open part way (this will start draining water from the PVB).
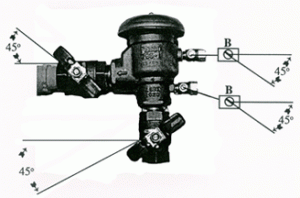
- Go to the PVB and open the 2 small ball valves on the side of the PVB with a screw drive to a 45 degree position (this will allow air into the piping and compete the draining process).
- Turn the handles of the 2 large ball valves with blue handles to a 45 degree position to complete the winterization.
- The drain back valve in the basement can remain open all winter. Should water continue to drip from this valve during the winter, the main shut off valve is leaking and should be replaced by a plumber to avoid freeze damage to your sprinkler system.
